It’s finally here! Do you have a special Valentine’s Day planned? Does it remind you of when you were in elementary school and had a party at school where everyone exchanged valentines? I think we either made our own valentines with construction paper, paste or Elmer’s glue, and doilies or we bought a box of valentines with envelopes that we would just sign on the back to give out to classmates. Then we also had a decorated shoe bag or lunch sack at our desk and everyone would scurry around delivering valentines! Even when my kids were in school I remember getting to meet other moms in their classes to help with the Valentine party.
The greeting is stamped with Melon Mambo ink on Basic White cardstock. This is in the Hearts of Elegance Stamp Set. The banner shape was then cut out with one of the Stylish Shapes Dies. To add a little bling, I added some gold gems. You can use whatever you have. Lots of embellishments would look very pretty!
Have a wonderful Valentine’s Day and I hope you get some good chocolate candy!
If you are looking for some last minute Valentine ideas, here are some from past years that you can make with stamps and paper in your older “stash” or update them with newer craft supplies.
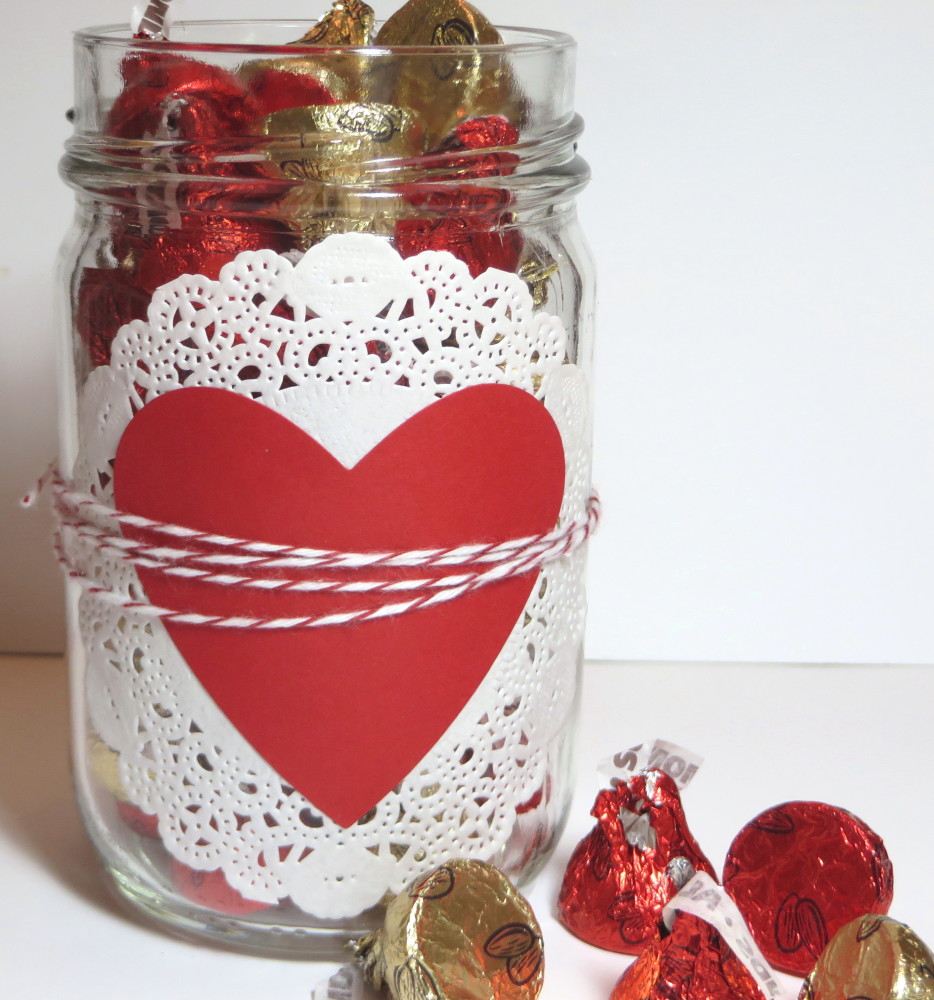
The first one you see above is super easy if you want to make a treat for someone….or put a candle inside! Just grab a jar, a doily, and a heart! Tie some ribbon or twine around, even add a greeting if you like and you have a very cute holder for some candy, a small gift, cookies, whatever you have that will fit in your jar. You don’t even have to have a lid, but if you do, you can decorate the top of the lid.
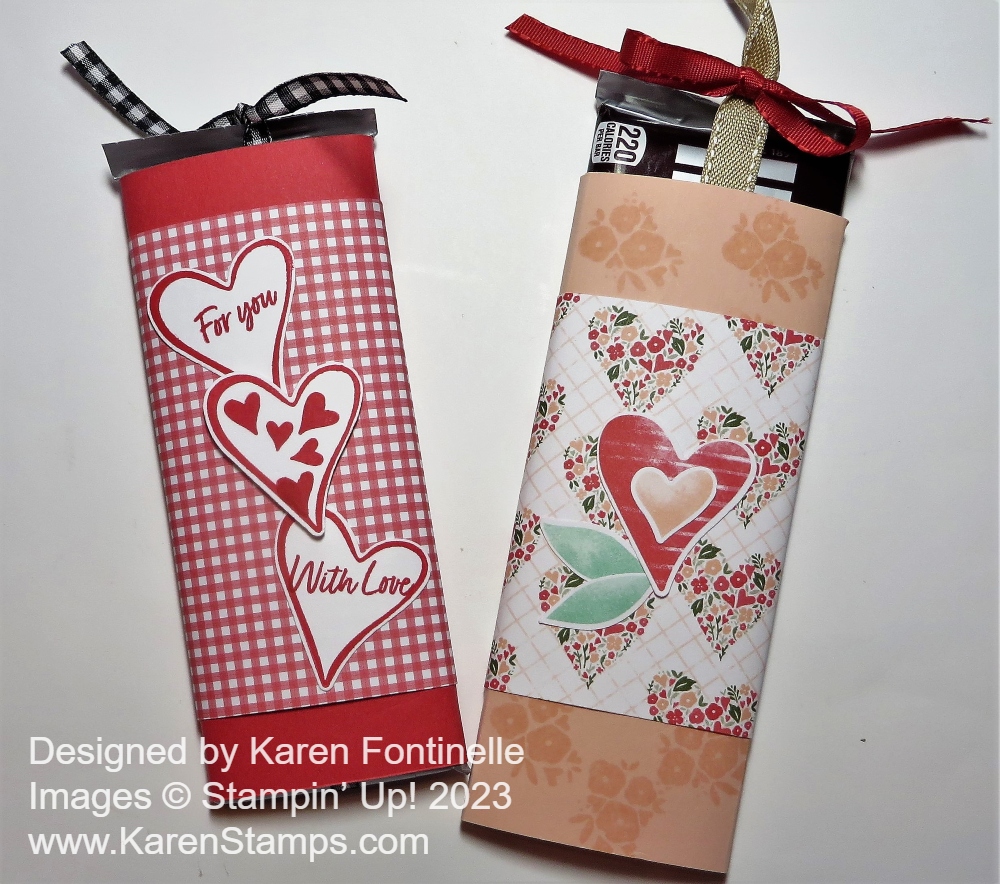
Get a regular-size chocolate candy bar (or even the gigantic ones!) and wrap it with cardstock or designer series paper and decorate. Even if you almost have no supplies, you can cut out or draw hearts for sure! If you want, tie a ribbon around the candy bar lengthwise you they can pull it out of your decorative wrapping without tearing it open!
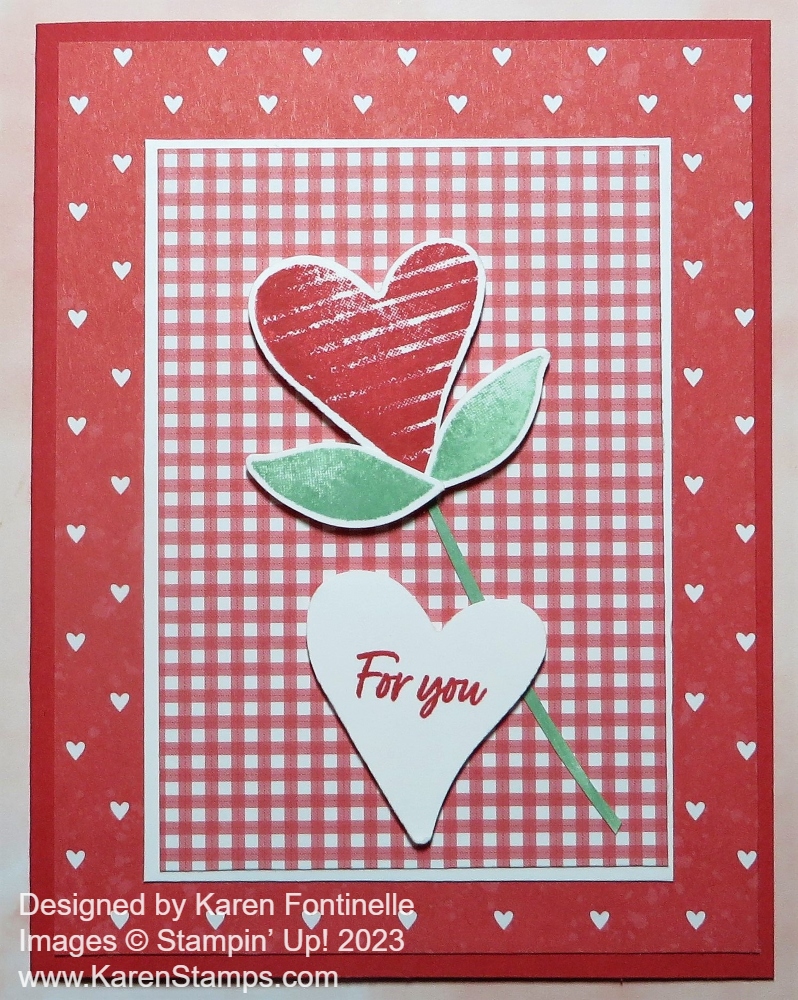
Use this card as an idea to make a flower out of a heart, a couple leaves, and a stem! While you’re at it, make two or three heart flowers! You can make a card similar to this one or decorate your Valentine jar with one.
This idea is an oldie but goodie paper craft….candy holders in a matchbook design! Just fold a strip of cardstock, cut or punch a slit in the bottom section that folds up and slide a chocolate square into it. Decorate the cover and you’ve got it. Click on the title to go to the blog post for all the directions.
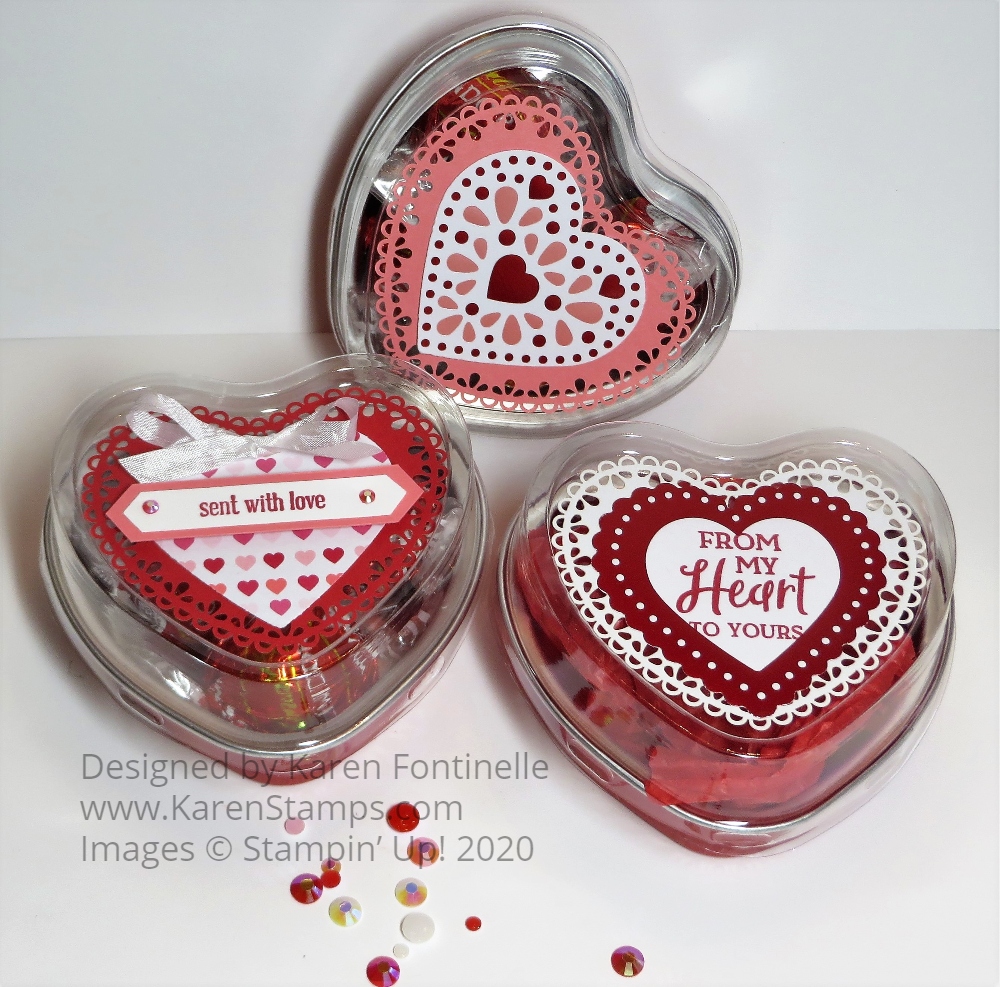
Maybe you still have a few of these Heart Foil Tins in your stash somewhere, but if not, just decorate a small box or whatever you have. Just use hearts or doilies, stamps, whatever you have to decorate your container.
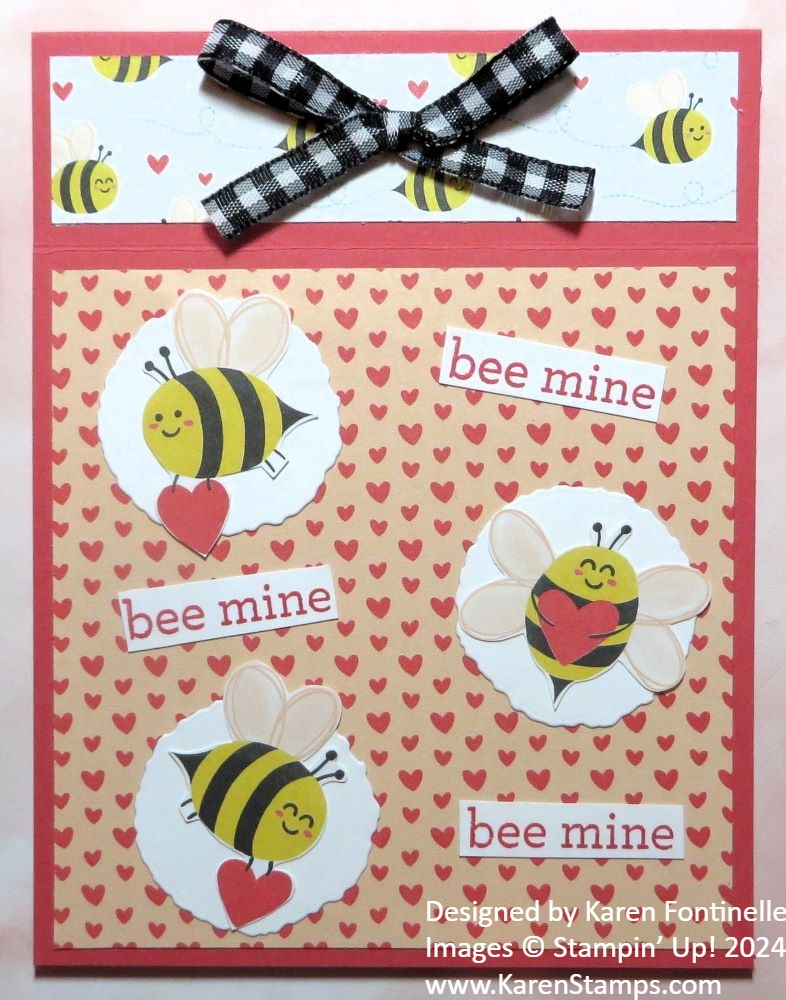
Whether you have the old Bee Mine Designer Series Paper or the newest Cute As Can Bee Designer Series Paper (which I think is almost the same designs, just different colors) you can make plenty of Valentines with any of the sheets. This card is the fun Book Fold design, with the fold at the top, which is very easy to make. Click on the title under this card for all the directions.
Hopefully these samples give you some ideas if you need to make a Valentine card or treat right away!
Valentine’s Day is coming up soon and if you have this ephemera pack, you can make this Celebrate Love Valentine Card very easily! And then you can make the same card but change the greeting and have a card for another occasion.
For this card, I used the Celebrate Love Mix & Match Ephemera Pack. These ephemera packs are so handy for just punching out some diecuts and making a card with no stamping. Of course, you can add stamping and anything else you want, but if you are looking for super quick and easy, usually any of the ephemera pack Stampin’ Up! has been offering for awhile really offer the solution. You will find this Celebrate Love Ephemera Pack in the Spring Mini (January-April 2025 Mini).
This card begins with a card base of Soft Sea Foam Cardstock with a layer of Pool Party cardstock cut at 4 1/2″ x 3 1/4″. You could make the layer 5 1/4″ x 4″ as we normally do. To the Pool Party center piece, I simply adhered the ephemera pieces using Multipurpose Liquid Glue.
I began with the white crisscross piece which to me looked like it could be a flower box or a cute little fence. Before glueing it down, I placed the flower diecuts where I wanted them so they “fit” into the flower box and just applied a little bit of glue at the top of those flowers so I could be sure they were where I wanted them to be. Then I went back and added more glue to the base of the flowers on the back to hold them securely. Adding glue to the flower box requires teeny tiny dots of glue in as many places as you can put it with a very light hand.
Above the flowers I added one of the hearts in the ephemera pack. This heart could be popped up with Stampin’ Dimensionals but I adhered it flat. Then I added a “Happy Valentine’s Day” banner in the Celebrate Love Ephemera Pack right across the heart. If you like you can add some gems or jewels for embellishments. I used the Heart Sequins which are unavailable right now but hopefully will be back in stock. You can use hearts any time for embellishments so even though Valentine’s Day will be past when they are available again, you can still order them if you like and use them on lots of kinds of cards and projects.
Now for an alternative card made the same way but with a different greeting. You could use this same card for a birthday, thinking of you, celebrate, congratulations, miss you, and lots more.
You can see this card is the same but I used a different greeting. I could have stamped any kind of greeting but I chose one in the Celebrate Love Ephemera Pack. This greeting is printed on one of the labels in the ephemera pack, but the size was too large for the heart. I simply cut around the words to make it smaller and it fit perfectly on the heart!
I’m having fun using these new ephemera packs. The first ones were in the Holiday Mini Catalog and now we have more in the Spring Mini. They make a card easy to design and still pretty! Sometimes simple cards are the best. Check out all the ephemera packs in the Spring Mini on page 13.
Are you interested in the Super Bowl today or are you more interested in stamping? Perhaps you will be doing both! Either way, here is another Valentine idea, the Poppy Parade Heart Shaped Valentine, in case you want to make some valentines to send or give. And really, if you changed this greeting on this card, you could make it for any nice occasion.
What I did with this card was choose two complementary colors. Complementary colors are colors opposite each other on the color wheel. If you have the Stampin’ Up! Color Coach, you can do this easily. I started with Poppy Parade since it is a red color but one that I don’t use very often…although when I do, I am really happy with using the color. The color opposite Poppy Parade on the Color Coach is Shaded Spruce. So those are the two colors I used on this card along with Basic White. I think it worked out!
The card base is Poppy Parade with a layer of the Marbled Elegance Designer Series Paper. Obviously the pattern is not one of the marbled designs but “the other side”, the generic side that you can use any time. For the focal point on the card, I stamped the wreath in the Heart Shaped Stamp Set in Shaded Spruce ink on Basic White. The three flowers are stamped with the Heart Shaped Stamp Set also in Poppy Parade ink and diecut with the Heart Shaped Dies. You can get the Heart Shaped Stamp Set and the Heart Shaped Dies in the Heart Shaped Bundle, FREE during Sale-A-Bration this month with a $120 purchase. It is a Level 2 product you can earn.
The Basic White piece is diecut using one of the large circle dies in the Spotlight on Nature Dies. I love how these have a decorative border on them. The diecut circle is adhered flat on the card but you could pop it up with Stampin’ Dimensionals. The three Poppy Parade flowers are also glued on flat on the wreath, but you could pop up these flowers if you wanted to. I also took the tip of a Poppy Parade marker and just dotted the little berries on the wreath right over the Shaded Spruce ink. Just do very tiny dots. You barely see them but I like the look.
I didn’t have Poppy Parade ribbon so I colored my own! I used the white ribbon in the Petal Pink & White 1/4″ Diagonal Trim Combo Ribbon and colored it with the Dark Poppy Parade Stampin’ Blend Marker. I colored on both sides and even touched up the edges a little if some white was still showing. Because they are alcohol markers, the ribbon dries quickly and then you can use it on your card. It’s so great we can make our own custom colored ribbon! I tied the bow and adhered it with a couple of Glue Dots.
The greeting is in the Celebrate Love Mix & Match Ephemera Pack. It had a colored border around it but I wanted it really thin so I trimmed off the border. Then I layered it on a thin strip of Shaded Spruce.
To each side of the greeting I added a little Heart Sequin. These are currently not available, hopefully you have them already, but if not, just use any jewel or gem that you like if you want a little sparkle or bling.
These two complementary colors aren’t too different to use on a valentine or other card, but it was fun to use my Color Coach in choosing the colors.
This Pretty in Pink Sending Lots of Love Card uses slightly non-traditional colors, but you can do that! I’d almost forgotten about the In Color 2024-2026 Petunia Pop! I tried to use the Color Coach Wheel to choose two colors for this card, but the In Colors are not on the wheel, but I think these two colors together work just fine.
This card base is Pretty in Pink cardstock. I used Petunia Pop for the center layer. It measures 3 1/2″ x 4 3/4″. Since it looked a little plain as the background, I embossed it with the Forever Plaid 3D Embossing Folder and the Stampin’ Cut & Emboss Machine.
The diecut hearts are Pretty in Pink and Basic White. I used the Hearts of Elegance Dies. These hearts don’t necessarily layer perfectly but they are close enough. Maybe that is the new style anyway! My hearts are adhered flat on the card but of course they could be popped up on Dimensionals.
The greeting is in the Hearts of Elegance Stamp Set. I love the sentiments and especially the fonts used for these! So pretty! I’d like another stamp set of various greetings in this same font. This greeting is stamped in Petunia Pop ink on Basic White. Then it was diecut with a label in the Unbounded Love Dies. You can purchase the Hearts of Elegance Stamp Set and Dies together in a Bundle if you’d like to have both and save 10%.
The other day I was looking in the closet wondering if I had more Valentine decorations than I had found so far. I’m used to SO many decorations for Halloween and Christmas that one red and white plastic bag just didn’t seem like that could possibly be all I had for Valentine’s Day! It actually was pretty much true, but I did come across just a couple more things and one was this old Valentine Collage that I made some years ago! I don’t recall how many years ago! All I can say is that the famous Owl Punch was a thing as you can see in the last square and also that Pretty In Pink was a regular Stampin’ Up! color at the time!
I wondered if I had a frame the Valentine Collage would fit in because obviously it had been in a frame at one time. The backing was still underneath the collage in the closet. I probably swapped it out for a Christmas collage at some point. As luck would have it, I did find a nice white frame for it. I just had to trim down the outside edges a little bit. I think it had to be fate that I found this collage in the closet AND a frame to put it in for my Valentine decorating!
Even though this Valentine Collage is way past its time, it can still provide inspiration for you to make something similar yourself for your home decor or even a gift for someone. You can make twelve squares or you can double-up two squares and make a rectangle in some of the spaces. Or put four squares into one big square! Whatever you like!
You might want to choose a frame first so you know what size to make your collage. You wouldn’t want to have to cut into or too close to your design. Maybe you would prefer a square shape. Lots of possibilities!
Think about making a fun, quick collage, maybe even a smaller one, for Valentine’s Day! You have time! Here’s an example of a smaller collage from twelve years ago!!
Or jump ahead To Easter if you like to plan ahead! Just have fun with it!
A very popular FREE product in the Sale-A-Bration promotion is the Heart Shaped Bundle. Sale-A-Bration is maybe Stampin’ Up!’s most popular promotion because you can earn a free product with a $60 purchase. For a larger order of $120, you can select a couple of different products, such as this Heart Shaped Bundle. This is a great Bundle to use for all-occasion cards or right now, Valentines.
This card has a Pretty In Pink card base. Pretty In Pink is one of the current In Colors, which I often forget about! The layer is Basic White stamped with Pretty In Pink ink around the edges with the trio of flowers stamp in the Heart Shaped Stamp Set. The white background seemed too bland so I decided to put at least a few flowers, some stamped off the edge, around each side.
The focal piece of the card measures 3″ x 4″ with a Pretty in Pink layer of 3 1/4″ x 4 1/4″. I started off making this card horizontal and changed my mind. You can design it either way. The heart-shaped wreath is diecut with the Heart Shaped Die. Don’t get the “Heart” sets mixed up! I couldn’t find this wreath die in the package and looked all over for it. It turned out I was looking in the Hearts of Elegance Dies instead of the Heart Shaped Dies! I was so relieved that I hadn’t lost it!
The wreath is diecut out of Soft Sea Foam cardstock. If you remember, it would be useful to put an Adhesive Sheet on the back of the cardstock before you diecut it. Then you don’t have to put the tiniest dots of glue on the back of all the leaves and edges. But I admit, I never remember the Adhesive Sheets until after I diecut the piece! The flowers are diecut out of Pretty In Pink. You can make the petals curl up a little bit befor adhering to the card.
The greeting is in the Heart Shaped Stamp Set. If you stamp it right on the card front, stamp it before you glue down the wreath and flowers just in case the stamping doesn’t go well! But really, if you messed up the stamping, you could just cut out a label shape to stamp on and then adhere that over the messy stamping. There is always some way to fix mistakes! But chances are, you will stamp it just fine.
For a little embellishment, I used the Party Dots. These come in three colors – Peach Pie, Pool Party, and Pretty In Pink. I added the Peach Pie dots to the flower centers and added two extra Pretty In Pink dots next to the greeting. These are great because they are pretty flat and don’t cause a problem mailing the card.
There are new Sale-A-Bration products to earn coming on Tuesday, February 4th!
Remember the Book Treat Boxes that were in the Holiday Mini Catalog last fall? I decided to make one into a Valentine Book Treat Box! You can still find these boxes in the Stampin’ Up! Online Store and they are handy to have on hand any time for a small gift or treat. Then just decorate for whatever occasion!
First step is to assemble the box. These Book Treat Boxes come ten in the package and are easy to assemble. They look like books! There are two pieces to each box. One is the box itself that fits inside the cover. They are all scored and even have adhesive strips to adhere everything together. You will easily see how to do it. The boxes are 3″ x 4″ with a 1″ side spine. You can decorate as little or as much of all the sides as you like. On this box, I decorated the front, the back, the spine, inside the front cover and inside the box. All you would have to do is decorate the front.
I used the Marbled Elegance Specialty Designer Series Paper, cutting the paper at 3″ x 4″ for the front and back of the cover, also inside the cover. The spine measures 1″ x 4″. The measurement for inside the box is just a tad smaller that 3″ x 4″. You can measure yours with a ruler after you assemble it to see the exact size.
For the hearts on the front, I used the Hearts of Elegance Dies to cut out a large Gold Foil heart and the same size heart in Melon Mambo. Then I layered on a Petal Pink pierced heart on top of the Melon Mambo and a small Gold Foil heart on top. The background gold heart is adhered flat on the box, while the other three hearts are first glued together then popped up on Stampin’ Dimensionals. The side tab that could be adhered to the top of the box is 1″ wide and I covered it with designer paper, then trimmed around the curved end. Since I wanted to be able to slip it underneath the hearts rather than adhere it, I popped up the hearts but didn’t put Dimensionals where I wanted that tab to go underneath.
The greeting is in the Hearts of Elegance Stamp Set. I stamped it in Melon Mambo ink on Basic White cardstock. To make it fit better on the box without taking away from the hearts, I decided to cut out around the word “Love”. I completely left off the “You” but it probably would have fit okay. This is a great way to save space with a greeting or you can cut the words apart and do your own spacing according to your project. You can decorate or not decorate the inside of the box before you add your treat! I did a little bit.
I think these boxes are great to have on hand so be sure to add them to your next order for a little different gift wrap or treat box idea. Or create a little scene inside as I did at Christmas on a project for my 12 Weeks of Christmas email.
There are lots of fun things you can make with these Book Treat Boxes! Try one!
It was a rainy Sunday afternoon yesterday so the perfect time to get out my January 2025 Paper Pumpkin Kit, Hearts For You. If you aren’t already a Paper Pumpkin subscriber and you didn’t get this kit in the mail maybe a week ago and you’ve GOT to have it, I can help you out a little bit on that! Stay tuned!
The weekend always seems like a good time to work on a Paper Pumpkin Kit. It certainly was a good time to work on this kit and get a bunch of Valentines made instead of at the last minute! If you aren’t familiar with Paper Pumpkin, it is a monthly subscription program for creative success! Paper Pumpkin subscription kits are designed for anyone who wants to quickly and easily achieve beautiful, handcrafted projects—anytime and anywhere! You’ll get a new project every month—one that’s great for all types of crafters. Inside the box and the pretty tissue paper, you’ll find a pre-designed, pre-cut paper crafting project. Everything is ready to stamp and assemble. The only thing you might need is a scissors. The kit even comes with adhesives! And anyone can make these projects, whatever they are!
In the photo above, you see I have opened up my box and the packages inside with all the supplies, have the directions out, and the exclusive stamp set. Your first kit will come with an acrylic block for mounting the stamps. Every kit also comes with one ink spot. I usually hoard mine and use my regular ink pad but the 1″ ink spots don’t take up hardly any space! There is always a video of the assembly of the project that you can watch, and I do like to watch it, but the pictorial directions in the box are easy to follow. It tells you exactly where to put the adhesive and how long the string or ribbon should be, etc.
Of course, you can always “go rogue” and make your own creations with the supplies you are given in the kit. There are always alternate designs you can find online using the kit.
Here are the three designs of the finished cards! You also get matching envelopes and in this kit, foil hearts to seal the envelope flap!
It was funny, when I made my first card (which is the second card in the top row), I stamped the hearts and greeting, tied on the twine, glued that piece to the marbled card base and I thought “Well, this card is okay but it lacks some pizzazz!” Then I realized I hadn’t added all the “things” yet!! There was the champagne foil outline of a heart, a smaller champagne foil heart, and the large Flirty Flamingo diecut heart with the foil accents. I added those things and then discovered there were also tiny little heart gem embellishments!! Once I actually completed the card with all the intended supplies, I thought it was beautiful for a valentine!
The second card I made was the bottom one in the photo. That card had a really creative background – lines of attached small white hearts! All I had to do, thought, was put the dimensionals on the back of each row, punch them out and adhere to the very faint guidelines shown on each card base. It went perfectly smoothly adhering all those rows of hearts! Then it was just a matter of adhering the two diecut hearts one layered on another, adding the foil word “Love” and stamping the little banner to put below the word Love. To complete it, I just added a twine bow.
The very first card in the photo was probably the easiest except for adding the dimensionals to the back of the foil heart so they wouldn’t show! But the directions showed how to cut one of the dimensionals in half to make them smaller. It worked fine.
All three cards for Valentine’s Day are very pretty and were fun to make! If you would like to get this kit, this is how you can do it. First of all, you must subscribe to Paper Pumpkin to purchase any extra full kits that are available or the refill kits. In this case, it looks like there is a Hearts For You Paper Pumpkin Refill that is available. With the refill kit, you will not get the ink spot and you will not get the exclusive stamp set. But if you have any stamps in your stash, you probably have an assortment of heart stamps and greetings that you could use on these cards, and if not, you can draw your own hearts with a red marker or red pencil or cut some out of red paper. You can write your own Valentine message on the banners with a marker or pen if you don’t have appropriate stamps. Just be creative! Actually, the only stamping you would need to do would be the card with all the hearts and on the greetings. And even if you omitted the greeting, the cards would still look pretty on their own!
If you are interested, subscribe to Paper Pumpkin and then order the Refill right away so it doesn’t sell out. It will count toward your Sale-A-Bration total as well! Once you subscribe, if Paper Pumpkin is not for you, then simply go into your account and cancel, or skip a month. It’s easy and no risk or obligation.
If you are already a subscriber and you’d like another kit or two to make more valentines, just order this Hearts For You Refill Kit right away!
This Hearts For a Valentine’s Day Card has to be one of the quickest and easiest cards I’ve ever made with no idea of what I was going to make! I know that sounds crazy, but yes, I didn’t know what I was going to make until I got out the Marbled Elegance Specialty Designer Series Paper and looked at the Hearts of Elegance Dies. Since I hadn’t tried all the dies yet, I just chose one. Then after diecutting with that, I chose another heart shape, and another one, and another one. Pretty quickly I had this card made!
The card base is Melon Mambo cardstock. There are several coordinating colors listed for these designer papers, but I mostly keep coming back to Melon Mambo….or Real Red on some cards I made. First I chose the second largest heart die, the one with the pierced border around the edge. I used a piece of the Marbled Elegance Paper, thinking at first I would use “the other side” and not the marbled size. Luckily, in my package I already had a 4″ x 5 1/4″ piece cut and luckily, I centered the heart die on this paper. After I cut it out it looked like the best idea was the adhere the negative piece to the card base with the marbled side up. I thought it was so pretty with that heart opening in the center. I didn’t even use the heart I had just cut out, but I saved it for another card another time.
Next I cut out another smaller heart from another piece of the marbled paper and placed it in the center of the open heart space. It needed something, so I cut out a larger heart from Gold Foil. Then for one more heart, I diecut a small gold heart with the decorative edge to place in the center. As you can see, once the hearts were all stacked on top of each other they looked so pretty!
I already had this greeting stamped and cut out in my scraps so I just adhered that flat in the corner of the card. For a moment, I thought about using the banner in the Mixed Labels Stamp Set to go across the hearts, but I liked the greeting I already had so I kept it simple and just used that. If you are trying to make a quick card, don’t overthink everything.
You could pop up some of the hearts or the negative piece on the card base. You could add some embellishments for a little sparkle. Or you can just leave it simple as is because the Marbled Elegance Designer Paper is so pretty on its own! It’s named Marbled Elegance for a reason!
Don’t forget…Sale-A-Bration is going on! Try to have a total of $60 or more on your order before tax and shipping or with $120 order you can choose from a couple of special Bundles or get TWO $60 Level products for FREE!
Here’s a fun Valentine to make! I used the book fold design which is easy to do and just gives a little different look to your card. You can make this Hearts of Elegance Love Book Card with this design and decorate it for any occasion.
To make the book fold card, cut a piece of cardstock at 4 1/4″ x 11″. Score at 4 1/4″ and 5 1/2″. Basically, you are cutting a sheet of cardstock in half vertically, scoring in half at 5 1/2″ and adding an extra score line at 4 1/4″. That’s the line that makes this a book fold card. Before adhering that book fold together you can choose to wrap some ribbon around the inside to tie on the front or punch two holes in that side book fold for some ribbon and a bow.
The card base for this card is Real Red. I adhered a 1″ x 4″ strip of the Cherry Cobbler color in the Festive Glimmer Paper. Even though it is not Real Red, I think it looks fine on the card. Before glueing the book fold, I wrapped around a very long piece of Gold Twisted Thread twice and then tied a bow. After having the book fold how I wanted it I glued it together with Multipurpose Liquid Glue or you could use Stampin’ Seal.
The front of the card is decorated with a piece of the Marbled Elegance Specialty Designer Series Paper. It is cut at 4″ x 4″. You could make it smaller and add a layer underneath if you wanted. This designer paper has gold foil marbled designs on it which is what makes it extra-special and fancy to use on Valentines and other special cards.
To decorate the card, I diecut three hearts with pierced designs with the die in the Hearts of Elegance Dies. These hearts are Gold Foil, Real Red, and Petal Pink. Before I decided on these three hearts, I used some of the other heart dies to cut out extra hearts and the ones I didn’t use I just saved in the Hearts of Elegance Stamp Set case. As long as you are diecutting, go ahead and make some extras of general things, like hearts, that you can use any time!
Here’s a tip for diecutting gold foil without leaving marks on the foil from your very used cutting pad! Place the dies on the cardstock you are cutting, then place a scrap piece of computer printer paper over the whole piece of gold foil. Run it through the Cut & Emboss Machine and the paper will protect the gold foil from looking scratched up!
For the greeting I stamped the “Love You” sentiment on Basic White cardstock in Real Red ink, but I chose to cut out around the word “Love” and also trim the word “you” just into a rectangle. It’s plenty easy to trim around a word or phrase like this for a different look to your sentiment just by taking your time, cutting outside the inked lines for the word and don’t go into every nook and cranny of the stamped word! Just use Paper Snips or some other sharp small scissors that allow you to twist and turn the paper to reach the areas you want to cut.
Everything is glued down flat, but you could pop up the sentiment or one or more hearts if you wanted to. For some extra embellishment, I added three Petal Pink dots in the Low Profile Dots. These are great because they do not stick up on the card barely at all so they won’t poke holes in the envelope when you mail the card! On the inside, put a layer of Basic White, maybe trimmed with a piece of the designer paper or a stamped or diecut heart so you can stamp a message or write a personal note inside the card. Then mail your Valentine or special card to someone who will be happy to hear from you!
If you want to make some easy Valentines, here is a design for you!! I think I could have made 100 of these! Well, maybe not, but I did make these Marbled Elegance Trio of Valentines! They were easy and fun and came to me right away! All you really have to do is get out the beautifulMarbled Elegance Specialty Designer Series Paper and start cutting!
The card bases are just Basic White cardstock. If you have the Thick White cardstock it might be a good idea to use that or you could use Melon Mambo for a card base, then Basic White for a layer and the center design would just be a little bit smaller than these measurements.
The side of the designer paper could vary a little bit, but I cut mine at 3 1/2″ x 3 1/2″. Obviously I used one of the marbled patterns with the gold foil accent marbling. It doesn’t matter which one! I layered the designer paper on a piece of Melon Mambo cut at 3 3/4″ x 3 3/4″.
Since there is plenty of space at the bottom of the card I simply stamped the greeting in that space right on the card. Now, it might be a good idea not to glue anything on the card until after you stamp the greeting in case it doesn’t come out well! But if you have everything glued down and the stamping isn’t perfect, just cut a label or banner or shape, stamp on that, then adhere over the boo-boo. On these cards I used Melon Mambo ink. All of these greetings are in the Hearts of Elegance Stamp Set.
I made each card a little bit different. On the first card, all I added was one gold foil die cut heart with one of the hearts in the Hearts of Elegance Dies. You can purchase the stamp set and dies together in the Hearts of Elegance Bundle and save 10%!
On the second card, I liked that middle heart cut out of the designer paper but it still needed something. I added two diecut Melon Mambo hearts on each side of the DSP heart. For a touch of embellishment, I simply tied a bow with the Gold Twisted Thread and adhered it to the center heart with a Mini Glue Dot just rolled up into a teeny tiny ball. This Gold Twisted Thread is part of the Marbled Elegance Suite or you can purchase it separately. The middle heart is popped up on Stampin’ Dimensionals.
For the third card, I diecut the fancy heart with the pierced design in Gold Foil. I popped it up on Stampin’ Dimensionals. And for a little more pizzazz, I added three Gold Dots in the Low Profile Dots package.
With only the Marbled Elegance Specialty Designer Series Paper, some diecut hearts, and a greeting you can make a very pretty card….or even three!
With the Christmas holidays and children home for two weeks altogether, coming and going, I haven’t had time to play with my new pre-order products for the upcoming Spring Mini Catalog on January 7th! I almost don’t remember what I ordered, but I will catch up! One thing I noticed I had was this new ephemera pack so this was something great to use to make this Easy Celebrate Love Hearts Card.
I got out the Celebrate Love Mix & Match Ephemera Pack and checked out what the coordinating colors were on the back of the pack. Pretty in Pink was one of the several colors so I started with that as a layer on a Basic White card base.
You see three precut heart images from the ephemera pack on my card, but that actually is just one in the pack. You can leave it that way or you can punch the pieces apart and use all or one or two of the hearts. There are also greetings in the pack. I loved the precut long flower image but wasn’t quite sure how to use it on my card. It took me a couple of minutes to somehow lay out the three individual hearts the way I did and then I felt like I was on my way to making a card I would like.
The long, curved flower stem was still a problem, but don’t be afraid to cut it apart as I did! That gave me two stems of flowers that were a size that fit my card better. I liked the way they looked just placed along the sides of the two hearts. I popped them up on Stampin’ Dimensionals when I was ready to adhere them to the card.
The third heart in the lower right of the card looked best placed over one of the colored hearts in the ephemera pack. These are sized just right for this purpose if you want some color underneath the white diecut heart. That heart is popped up on Stampin’ Dimensionals also.
It was easy to choose a greeting for the card and this one was in the Celebrate Love Ephemera Pack. I just adhered it flat on the card. You know I had to try out some of the new embellishments coming in the new mini catalog! I used the Pretty In Pink dots in the Party Dots package. They are fairly flat so good for mailing.
It still seemed like the card needed “something” so I used the Pretty In PInk Stampin’ Blend marker to add some very small dots on the white hearts. I was hoping this wouldn’t ruin the card, but I did like it. Not one to leave well enough alone, I wondered what some tiny little hearts scattered around in the background would look like, even if I ruined the card, I took the brush end of the Stampin’ Blend and made little hearts. If you push down a little on the brush tip and then lift up as you pull down a tiny bit you will make one side of a heart. Do it again on the other side and you’ll have a cute little heart!
That’s my Easy Celebrate Love Hearts Card that I made a little more involved than I first intended! It still was easy and would certainly be easy for you to copy! You can make this card with just the ephemera pack and none of the extra things I added to this card…except, of course, maybe the Party Dots! It’s just too fun to add some dots, gems, jewels, sequins, or whatever to a card for a little bling!
Get ready because the new January-April 2025 Mini Catalog is going live on Tuesday, January 7th, along with Sale-A-Bration! Try to order at least $60 so you can get a free product from the SAB brochure!
It’s a New Year and a new year for Paper Pumpkin, the fun monthly subscription from Stampin’ Up! Each month a new Paper Pumpkin Kit will be delivered right to your mailbox. This January 2025 Kit, Hearts For You, will be the fun Paper Pumpkin Kit perfect for Valentine’s Day! Or of course any time you want to send hearts to someone throughout the year!
Paper Pumpkin is a monthly, all-inclusive crafting kit that you subscribe to. Each kit includes a photopolymer stamp set, Classic Stampin’ Spot, and step-by-step instructions to complete exclusive paper craft projects, including cards, tags, and gift packaging. There is no obligation to subscribe for any length of time and you can go into your account and skip a month any time you need to. Stampin’ Up! guarantees each Paper Pumpkin Kit so if you ever have a problem or question about your subscription, you can contact them and they can assist you. Here at the beginning of the year is a great time to try out Paper Pumpkin or come back if you were a past subscriber given there is no risk, obligation, or pressure to continue.
JANUARY: Hearts for You Subscribe December 11–January 10 Create heartfelt cards for Valentine’s Day, Galentine’s Day, and beyond! • Makes 9 cards: 3 each of 3 designs with 9 envelopes • Heart-shaped precut pieces and stickers • Twine and heart gem embellishments • Coordinating colors: Flirty Flamingo, Petal Pink, Real Red (Classic Stampin’ Spot)
Since this will be useful for Valentine’s Day, keep in mind you can order more than one kit in your account if you’d like to make more than 9 cards! Order a couple of kits to make with your children, grandchildren, or friends for fun!
Lots of new products released today at Stampin’ Up! for YOU! Here is the Color Coach(166481) to help you with color combinations for your cards and projects! Be sure you select the English version in the Online Store!
New Kits in the Kits Collection today! And plenty of good ones already available so look at all of them in the Stampin’ Up! Kits Collection!
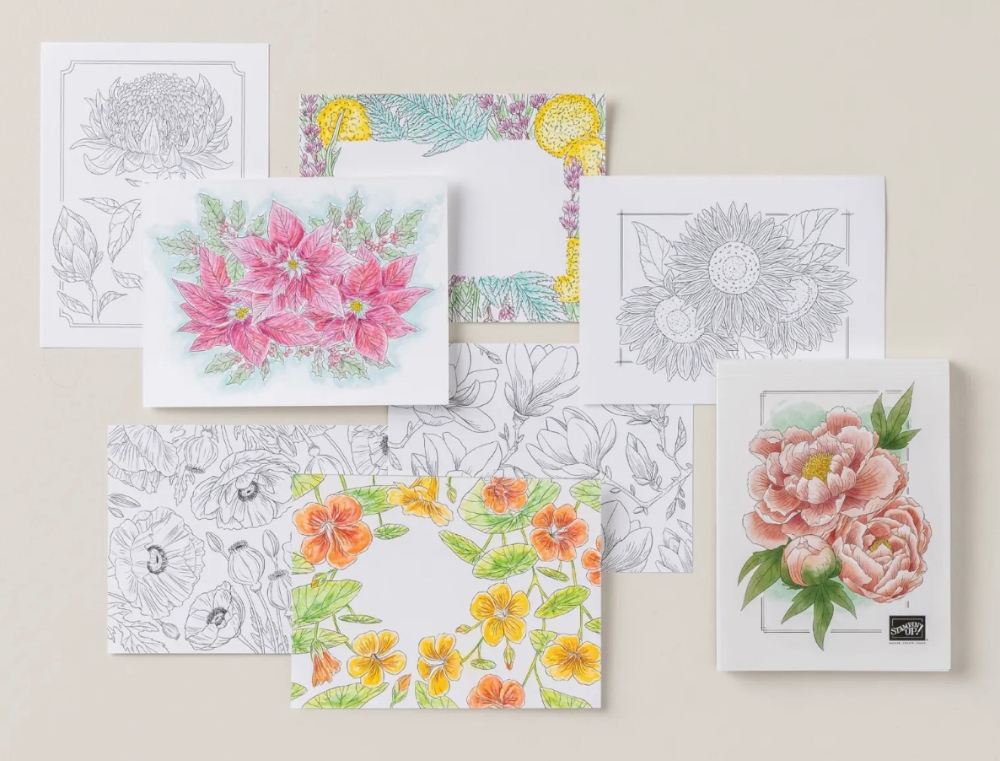
The Nature’s Painting Kit contains a line art coloring book, watercolor pencils, and a water painter so you can try out your creative side in a new direction! Watercolor pencils were one of my favorite things when I started as a Demonstrator!
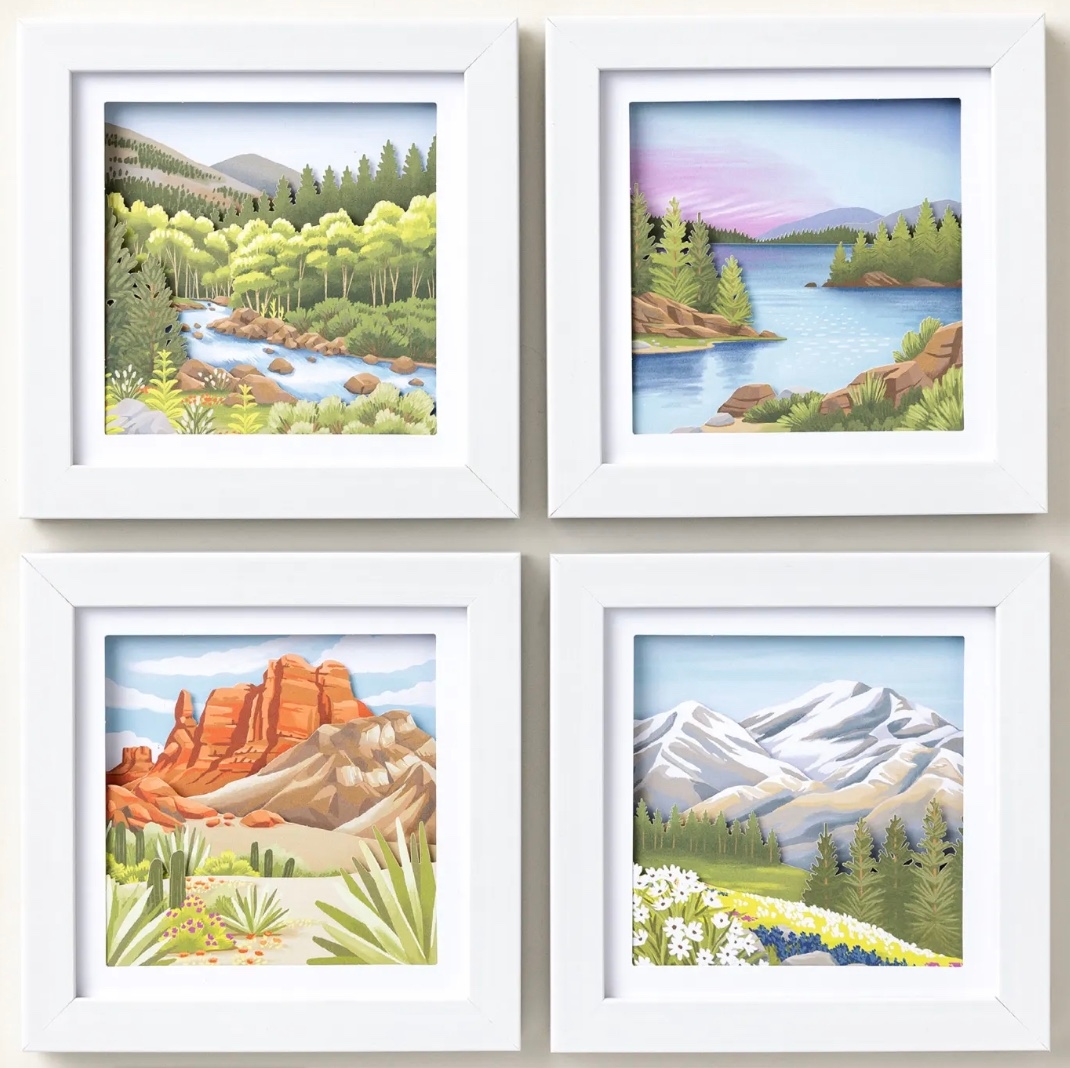
This Layered Landscapes Kit is an easy home decor project for you that comes with the 7 1/8″ x 7 1/8″ frames and easy pieces to layer to build the landscapes.
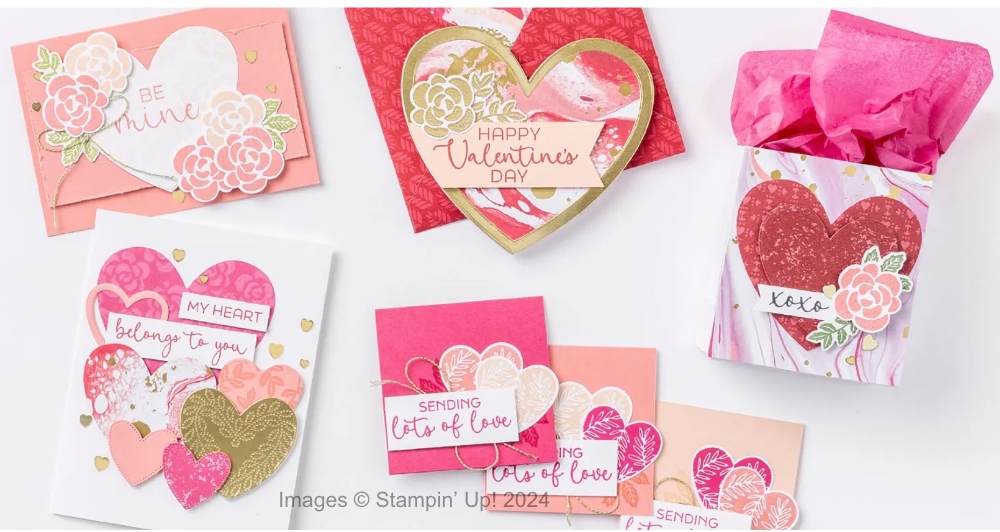
There are lots of newOnline Exclusives products available online only (not in a catalog) and not just for Valentine’s Day as my picture above would suggest! This is one Suite, the Marbled Elegance Suite, but there are many other new products! There is no one picture I can post that gives you all the information! Check it all out here in the New Arrivals! More information in future days! If you see something you REALLY REALLY want, I’d order it right away!