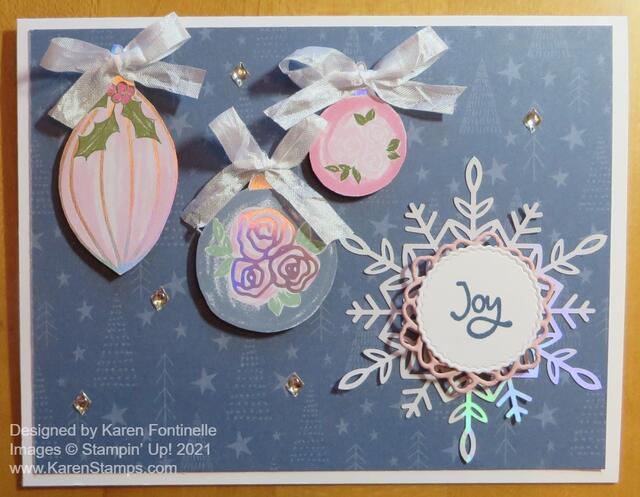
This is another card that completely changed from the idea I had in my head and it all came about because I turned the “pretty” side over! I realized I hadn’t used the very pretty ornament print paper in the Whimsy & Wonder Specialty Designer Series Paper so I was going to make a card using that paper. But when I turned the paper over to cut out just a section that I needed for the card, this dark blue print side just jumped out at me and this Whimsy & Wonder Ornament Christmas Card was born! I pictured using a snowflake and one blue ornament plus a greeting somehow, but I couldn’t resist all the other ornaments either!
Just because I’m a Stampin’ Up! Demonstrator, don’t think that card ideas come to me magically. The placement of everything on this card just was not working out, so I finally had to give up, step back, and walk away for a few minutes. I googled this paper and although I wasn’t copying anything, I saw something that sparked the idea to put the snowflake and greeting in the lower right corner instead of the upper left. That seemed to make all the difference and I was able to complete the card design!
The card base is Basic White although you could use Misty Moonlight as the base with a thin margin of Basic White under the Misty Moonlight Designer Paper to help it stand out. I cut out several ornaments from the other side of the paper with my Paper Snips while I watched TV. If you wanted to make it easier, you could just cut out the outline of the ornament and not the ornament hanger portion because if you add a bow later, you can cover up that you cut that part off!
The snowflake is in the Wonderful Snowflakes package. These are quite pretty, plain white on one side and iridescent foil on the other side. I adhered the snowflake with the tinest drops of glue, but you do have some space in the center of the snowflake. Then if you are pasting anything over the snowflake, maybe that will help hold it down also.
The greeting is in the Whimsical Trees Stamp Set. I thought maybe the simple word would go well with the snowflake. I stamped it in Moonlight Mist Ink and die cut it with the small circle in the Tasteful Labels Dies. I played with different dies and cardstock colors on which to layer it and finally settled on this Blushing Bride pink. I used a small die in the Encircled in Beauty Dies. The snowflake is adhered flat to the card and the greeting is popped up on Stampin’ Dimensionals.
The ornaments are all cut out from the opposite side of this paper. I just adhered them with Stampin’ Dimensionals and adhered a little bow on each one with a Mini Glue Dot. The ribbon is the White 1/4″ Crinkled Seam Binding Ribbon. I think a silver trim would also work well. Then for some bling I added some Silver Epoxy Essentials. I think they match well with the paper and look!
After a slow start on this card, I’m really happy with how it turned out. Be sure you check the “other side” of our beautiful designer papers because you just might find something special. And remember, a lot of the “other sides” can be used throughout the year, not just during the season the paper was designed for. This Whimsy & Wonder Ornament Christmas Card even uses both sides of the same paper by cutting out the pretty ornaments! Try it!


